

How to Outline a Novel: Get a Novel Framework
Novels have shape.
Not only do they have a beginning, middle, and end, but a good novel will have peaks of conflict and excitement and quieter moments of reflection and emotional connection.
They will rise towards a satisfying climax and conclusion, but not without taking some detours and unexpected turns on the way.
So how do you ensure your novel carries your reader along, keeping up a pace without being relentless, and drawing your readers through the highs and lows, challenges and triumphs towards an end that leaves them thrilled, and also keen to read your next book?
The answer is: an outline.
Should you create a novel outline before or after you write your first draft?
Many writers create an outline before they start writing, to ensure their story hits all the right beats that resonate with our human psyche before they start writing.
But many other writers prefer to discover the story as they write it, without creating any kind of plan or outline first. However, that doesn’t mean outlines are of no value to these writers – it simply means they must map their story to the outline afterward, pulling this scene forward or pushing that one back – and adding in a beat here or a conflict there.
Types of Outlines and Outlining Techniques
There is a wide spectrum of outlining techniques available, from the minutely detailed blow-by-blow account that may stretch to tens of thousands of words, to a simple set of bullet points.
How to choose the best type of outline for you?
The best way to find out which outlining technique suits you, is to try them out.
Personally, I have created detailed book outlines which describe what happens in every single scene, and I have written novels with a simple single-page synopsis. I have tried writing a novel with no plan at all, but I find I naturally start making notes about things that might be coming up, and trying to get them in rough order before I get there.
If the joy of writing for you is finding out what happens, almost like a reader, then you may only want to start with the vaguest idea of where it’s going, and retroactively apply story structure.
However, if you have found in the past that your attempts at writing novels have either fizzled out as you run out of ideas or end up being abandoned because there are too many strands with no idea how they will tie together – then it might be worth considering creating a slightly more detailed plan in advance of writing.
Personally, quite opposite to finding the planning stages take away the joy and excitement of the story, I find I experience that joy of discovery during that phase, and I love that I’m free to explore the possibilities of my characters’ adventures without being slowed down by trying to put it into nice words.
Outlining Methods for Every Writing Style
Below I have listed a range of outlining techniques, from the detailed to the more freeform. Some describe every single aspect of the novel in depth, while others just give you a few broad brush strokes to get started.
Many of them can be used in conjunction. Consider it a pick-and-mix toolbox that you should dip into as suits your own personal writing style.
1. The Novel Writing Roadmap
The Roadmap is a step-by-step guide to writing a novel that I developed to help me with my own novel writing. It starts with a kernel of an idea, then expands that into something more detailed (with the support of established genre-specific plot templates) then weaves in character development, goal-to-decision cycles, and even scene outlines.
If you’d like a very in-depth guide to outlining a novel, then you might find the Novel Writing Roadmap suits you. There is far too much to go into here, but if you think you might find it helpful, then you can read more about it here.
2. Plot Templates or Story Skeletons
Using a Plot Template is probably one of the most common ways writers outline their novels. Over the decades and centuries, patterns have emerged in the stories that have remained popular, and writing scholars have tried to pin down and formalize those patterns.
There are very well-established generic structures, such as The Hero’s Journey and The Five Act Structure, which can be applied to almost all stories. But you can also find more specific templates which apply to individual genres, such as romance, thriller, or mystery.
Check out a range of these plot templates here.
As mentioned above, you can use a plot template to structure your story either before or after you have a first draft. If you do it before, you are pinning down the major story beats and then working out the details later, not forgetting that these details will greatly influence the story and may dramatically shift it from your original plan.
If you prefer to structure afterward, then once you have written your first draft, go through it to see if you can identify the major plot beats of your template, such as the setting of the scene, the disturbance, the midpoint, and the low point.
If any of the beats are missing, consider if adding a scene to service that beat will strengthen the story. Or if it feels like the beats come in the wrong order, think about what impact that is having on the reader’s experience. Would moving things around help the tension ramp up better?
When working with plot templates, it’s important to always keep in mind the mantra ‘tools, not rules’.
Plot outlines can be extremely useful in strengthening your story and making it more effective – however, you should never be a slave to the structure. The story should always come first.
So if your book is deviating from the structure, but you feel like it works, and you even have evidence that your readers are enjoying it – then don’t feel there’s something wrong with it, just because it doesn’t tick all the plot outline boxes.
3. Question Arcs
Question arcs are a useful method for ensuring your story is constantly raising questions in your readers’ heads to keep them hooked and turning the pages. This method is particularly useful for thriller writers, as the constant raising of questions is key to keeping readers of this genre engaged.
To use the question arcs technique, take a large piece of paper and draw a vertical line down the side. Draw a dot on the line for roughly where a question is raised in your story, then beside the dot, write what the question is.
For example, if a body is found in the opening scene, draw a dot right at the top of the line and beside it write: ‘Who killed X?’.
Then, draw a dot on the line to represent where this question is answered in the book. If the question is answered near the middle of the book, draw the dot about halfway down the line. If the question is answered near the end, draw the dot near the bottom. Now draw an arcing line between the question and its answer.
Repeat this for each of the questions that are raised and answered in the book.
What many writers find when they complete this exercise, is that they raise a lot of questions near the beginning of the book, and provide a lot of the answers at the end. So there are a cluster of dots at the beginning and end, some large arcs, and not much in the middle.
However, if you want to keep your reader engaged, it is better to have a more even spacing of questions and answers, answering some questions while continually raising new ones. When you do this, your diagram will have some larger arcs, but also quite a lot of smaller ones, like fish scales, throughout the story.
Using your question arc diagram, see if you can shift some of the questions and answers, or add in smaller questions, so it has a nicely balanced pattern of curves.
4. Index Cards / Post-it Notes
This can be combined with using a plot outline but doesn’t necessarily have to.
In this technique, you take a stack of index cards or post-it notes and write down key moments, turning points or scenes on each of them. You can then lay them out so you can get an overview of the key points of your story.
This helps you see where there are any gaps, so you can add in extra scenes, conflicts or plot points until your story feels like it is complete.
5. Goal to Decision Cycle
The Goal to Decision cycle is a very freeform method, which can help create a story which flows naturally from one event to the next, while constantly raising the stakes and the tension.
It can be used in conjunction with a plot template, or just used in isolation.
It can also be used ‘live’ by discovery writers to help ensure their story has structure, without being too restricted.
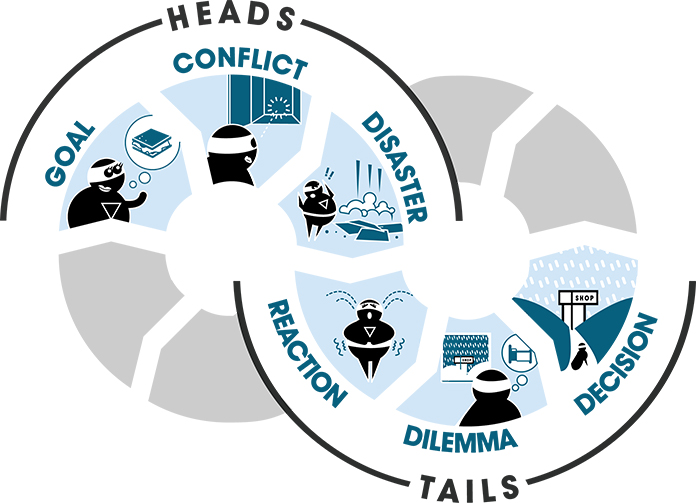
Basically, the goal to decision works like this:
Your character starts with a goal. However, there is some conflict, which stops them from achieving their goal. They battle the conflict, but unfortunately, the situation ends in disaster – with the character being in a worse situation than they were at the start.
Following this blow, they have an emotional reaction, which resonates with the reader. Then, they have a dilemma. What are they going to do next? Once they have made that decision – that forms their new goal, and the cycle begins again.
Following this freeform structure helps avoid a story becoming meandering, or the protagonist jumping to random conclusions or doing something just because something needs to be done to keep the story going.
You can read about the goal to decision cycle in a lot more depth here.
6. Yes… but, No… And
If you like the idea of the goal to decision cycle, but want something even simpler, you could try the Yes… but, No… And.
In essence, you start with a goal again – something your character wants to achieve. You think about how they’re going to go about that. Once they have decided what they’re going to do, you look at that and choose either a Yes..but or a No….and.
If you choose the Yes… but, then the character does achieve what they wanted… but… there’s a catch. There’s a new complication leading to a new goal or obstacle.
On the other hand, you may decide that their actions do not result in the achievement of their goal. And… not only that, but a new complication is raised.
Again, you simply cycle through the two options until the climax of the story.
How Novel Factory Can Help You Outline Your Novel
The Novel Factory is designed to support authors in planning an outline for their novel before they begin, and also in retroactively analysing an existing draft, to see where the structure needs finessing.
For writers who haven’t started the book yet, the Novel Factory can offer whatever level of support you need.
If you’d like to be guided through the entire process in a course that has been favorably likened to an MA in Creative Writing, then you can follow the integrated Roadmap, which takes you all the way from the initial idea through to your final draft.
Or, if you want something a little more freeform, simply dip into the drag-and-drop tools of the Plot Manager and Subplot Manager which let you get a clear overview of your story with index cards and color-coded threads – and even provide templates for popular genres such as thriller and romance, with all the key beats mapped out and explained.
If you already have a draft, then plugging the key beats into the Plot Manager, possibly even mapping them to one of the provided plot templates, will help you instantly see if where there might be gaps or sections that drag on
Summary
I hope you find some of the book outlining techniques described in this article useful – and if you have feedback or other techniques you’d like to share with us – please do join our Facebook community, or you can email us at info@novel-software.com
Happy outlining!
Unlock your writing potential
If you liked this article by the Novel Factory, then why not try the Novel Factory app for writers?
It includes:
- Plot Templates
- Character Questionnaires
- Writing Guides
- Drag & Drop Plotting Tools
- World Building resources
- Much, much more