

How to Do a Thorough Self-Edit
This is a guest post by Krystal N. Craike, the Writing Pirate
Congratulations! You’ve finished the first draft of your novel. Pat yourself on the back. Open a bottle of champagne. You deserve it!
But the work isn’t over. Now you need to edit the darn thing. And editing is a word that can strike fear into even the most experienced writer’s heart.
Where do you start? How do you ensure your book is the best it can be?
I like to use what I call the funnel method. It’s not revolutionary—most editing advice suggests the same basic structure. But I imagine it like a funnel or inverted pyramid: start with the largest issues and edit to progressively smaller issues.
It can be tempting to fix every misspelled word and wayward comma on your first readthrough. Resist the urge, because there’s a good chance you’ll change that whole sentence later. Proofreading too soon can create more work for you.
Here’s how to make editing thorough, methodical, and efficient.

Step 1: Put the Red Pen Down and Read
I always recommend taking at least two weeks off before returning to your manuscript to edit. Then read it. Don’t make changes. Just read it. I like to save the manuscript as a PDF so that I can’t start editing before I’ve read the whole thing.
While reading, you can take some notes on major issues:
- Does the beginning hook you?
- Are your characters behaving consistently?
- Are the stakes and motivations clear throughout the book?
- Are there places you should add, remove, or rearrange chapters
- How is the overall pacing?
- Do all plot threads get resolved?
- Are there any major plot holes?
This is not an exhaustive list, but it covers many aspects of developmental editing, which leads us to the next step.
Step 2: The Big Picture
Developmental edits, also called substantive edits, fix major issues that persist through the whole book. This is the broad end of the funnel. Take a look at your notes from your readthrough and fix each major issue that you see.
Issues like character consistency will appear through many scenes. Plot holes may be as easy to fix as adding or subtracting a sentence, or they may require some major restructuring.
I recommend starting with what you think will be the most difficult to fix. At this stage, don’t worry about individual sentences or word choice. If you need to add scenes or chapters, this is where to do it.
Step 3: Scene Surgery
Next up, you need to do content edits. Content edits are a stage between the overall structural edits and editing line by line. In this stage, you will work scene by scene.
I recommend taking a week or so off after finishing your developmental edits. Work on another writing project or do something else creative. That way, you will come back with fresh eyes. If you have the time, it’s always a good idea to read the draft again, taking more detailed notes.
When you start content edits, one of two things will typically happen, depending on the author and their writing style. You will either need to add quite a bit, or you will need to trim a lot of fat.
I fall into the former camp. My first drafts are very short, and I have to elaborate many areas to make sure everything is clear to my readers. That doesn’t mean I don’t cut things, but overall, this stage of editing is about beefing up my writing.
Many authors write long first drafts, and they need to be trimmed. You might over-explain, your pacing might be too slow, or you might go off on tangents. You may realize whole characters and plot lines need to be cut. If you’ve heard the phrase attributed to various writers from William Faulkner to Stephen King, “kill your darlings,” this is what it’s talking about.
Edit mercilessly. For every scene, every character, every plot line, ask yourself: is this necessary to the plot? If it’s not, get rid of it, no matter how much you love it. Copy and paste it into another document; maybe you’ll use it in a future story.
When you’re doing scene surgery, you also want to look for these things:
- Is my point of view consistent in each scene?
- Is my voice consistent throughout the story?
- Have I over-explained or added unnecessary detail?
- Have I included enough sensory detail?
- Am I “showing” more than “telling?”
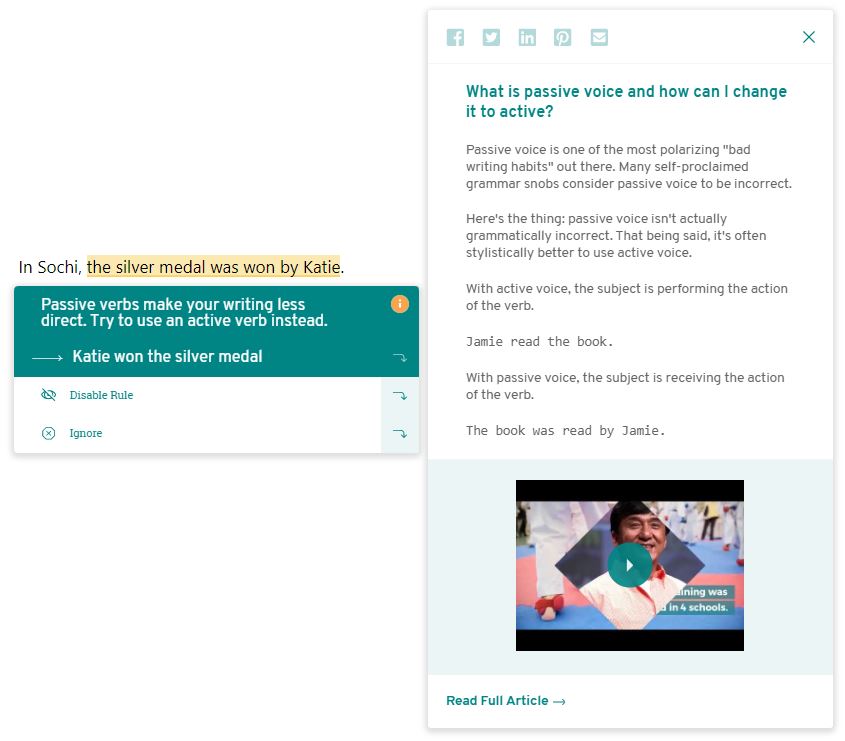
- Have I checked for instances of passive voice?
- Does my dialogue sound authentic?
Using sensory detail and showing rather than telling are difficult skills for many writers to master. But we want our readers to feel what our characters are feeling. Don’t just tell us your character is cold in the snow. Describe the shivers and numbness, the red face, the layers of clothing.
The good news is that there are useful tools out there which can help you tighten up your writing.
For example, ProWritingAid’s Style Report is a life-saver for finding both “telling” and passive voice. I’m able to find many areas that I might otherwise have missed, and beef up those descriptions. When you run the Style Report on your chapter, you’ll get a list of several flagged categories. The “emotion tells” identifies areas that might require more showing. Passive verbs and hidden verbs help you ensure every verb is packing a punch.
You can run a Pacing Report, too! This can highlight possible issues with the pacing of your scenes. I highly recommend running this on individual scenes or chapters, as it works better with smaller chunks of information.
Make sure each scene starts and ends well, and the characters have a clear goal for that particular scene.
Step 4: The Editing Microscope
You’ve looked at the whole story. You’ve dissected each scene. But your book still isn’t ready! Now we zoom in sentence by sentence to make sure every word is packing a punch.
Line edits, also known as copy edits, are when you go line by line to look at word choice, flow, and consistency.
Word choice is the most important part of line editing. First of all, notice your overused words and find synonyms. Did you describe something as green three times in a page? Look up some other shades like emerald, ivy, or chartreuse.
Cut down on your adverbs. They don’t add as much to descriptions as using a powerful verb. For example, stormed is a more vivid way to say walked angrily. Make sure your verbs are doing most of the heavy lifting in your sentences.

You can find all of your adverbs in the ProWritingAid Style Report. I love this feature as opposed to some other editing programs because it differentiates between adverbs in dialogue and adverbs outside of dialogue.
You should also check the flow of each sentence. If you reach a particularly long sentence, read it out loud. Does it actually sound clear? (I’m a big advocate for reading your entire book out loud to yourself. You catch a lot more mistakes this way.)
You should also check how these sentences flow together. Have you started four sentences in a row exactly the same way? That will sound redundant. Do you have too many long sentences together, or too many short sentences? That affects the pacing of your story, and it can sound repetitive. Make sure your verb tenses are consistent.
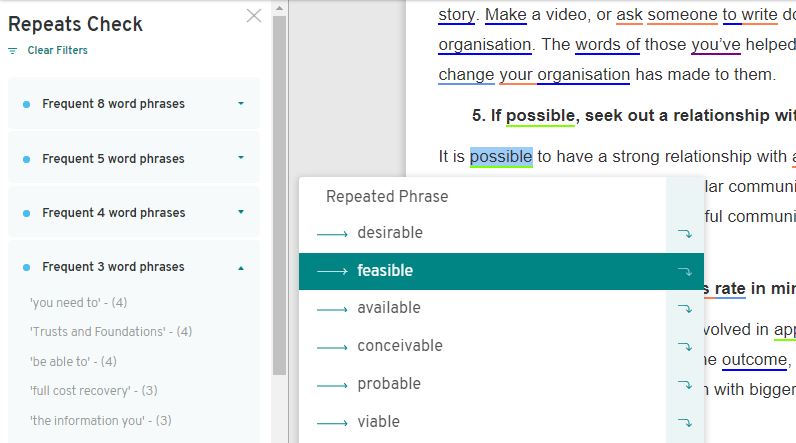
You can check many of these technical elements with the press of a button on the ProWritingAid tool. I have saved so much time in editing by seeing my repeated sentence starts, adverbs, and sticky sentences flagged by the software. I use the Style Report, the Echoes Report, and the Repeats Report to identify my redundancy issues.
Step 5: Proofreading
You’ve done it! Your story sounds amazing. The flow is fantastic, the plot is solid, the prose is beautiful. But there is one final step: proofreading.
Proofreading is the final check for spelling, grammar, and consistency. I love grammar, and I get paid to write about it. I was a spelling bee champion at my elementary. But I still make a ton of mistakes when I’m writing because that’s not the thing we focus on. And even after I have polished all of my grammatical errors, my proofreader still finds more.
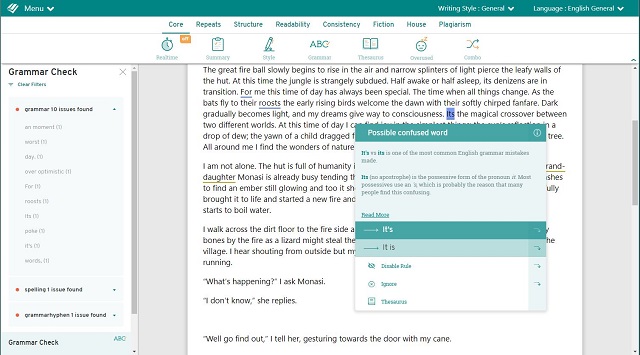
Good editing software makes this process a lot easier, and additionally checks for consistency. This includes things like the way you’ve written numbers and dates, capitalization, and hyphenation. Did you use the British spelling of a word in chapter two but switch to the American version in chapter seven? You won’t necessarily pick up on that with just your eyes, especially since you’ve become so familiar with your story at this point. The Consistency Check is usually the last report I run on ProWritingAid.
The Final Product
Editing doesn’t have to be scary! Start with the big picture and work your way to the smallest mistakes. Be methodical, and give yourself plenty of time to complete each stage. A rushed manuscript is a messy manuscript.
But with patience, time, and a game plan, you will produce a beautiful story. There’s no such thing as a perfect manuscript (I have found typos in every published book I’ve ever read), but thorough self-editing will get you pretty darn close.

Krystal N. Craiker is the Writing Pirate, an indie author and freelance writer who sails the seven internet seas, breaking tropes and bending genres. She has a background in anthropology and education, which bring fresh perspectives to new adult genre fiction. When she’s not daydreaming about her next book or article, you can find her cooking gourmet gluten-free cuisine, laughing at memes, and playing board games. Krystal lives in Dallas, Texas with her husband Michael and two dogs, Darwin and Franklin. Check out her website.